
I really like skirted tables. They are a great way to introduce some fabric and color into a room, and they can be fairly inexpensive to make if you know how to sew one yourself. You can cover up all kinds of things with a table skirt: an old table, a bookcase, etc. Think of them as chic slipcovers for ugly furniture! :) I like to keep my eye out for fabric remnants that can be turned into a table skirt. This allows me to even make more than one skirt for the same piece of furniture so that I can easily switch out the look.
Sewing a table skirt isn't really that hard; it just requires some careful measuring and planning. The basic steps are: 1) plan your design, 2) estimate your yardage, 3) cut your pieces, then 4) sew it all together.
Step 1: Plan your design. First you will want to decide how you want your finished table skirt to look. Do you want it to be a solid color, a pattern, or maybe two different types of fabric? Do you want to use piping (or welting) along the top or bottom? Do you want the skirt to have pleats? A few practical considerations: pleats require more fabric, but they will make it much easier to lift up the skirt if you will need to do that often (for instance, if you are going to be storing things out of sight underneath the table). Here are a few examples of tables in my own house:

This table skirt has a round top (we added a circle of wood to a square table) with evenly spaced pleats and self-welt around the top piece. (Self-welt is piping or welting made out of the same fabric as the rest of the skirt. You can also do contrasting welt in which you use a different fabric for your piping.)


Here you can see the piping and pleat close up.
This blue table skirt is simpler: it doesn't have any welting, but it does have pleats on the corners.


(Ignore the leaning aloe on top; remember that from my houseplants 9-1-1 post? Yes, it really needs to be repotted!)
If you choose to add piping, you can either make your own or buy some pre-made (although that will limit you as far as the size of the piping and the colors available). To make your own, you will want to buy some cording at the fabric store, then cut diagonal strips of fabric (about 2 inches wide), place the cording in the middle of the strip, fold the cording around it, and sew right up against the cording using a zipper-foot. I think it makes it easier to cut out a strip of newspaper in the correct size, then pin it on the fabric and cut along the outline to make your strips (if you don't have a rotary cutter and mat).
There are many other cool designs you can make with a table skirt: you can add trim such as ribbon or fringe, you can add ruffles, etc. Try typing in "skirted table" into Google images and see what other creative things people have done. Designer Palmer Weiss uses a lot of skirted tables in her work; check out her portfolio for some inspirational images.


Here is a little picture I drew of the table skirt I am sewing for this tutorial. I am planning on doing a solid linen-type material for most of the skirt with a red-and-pink floral fabric at the bottom.
Here are the fabrics I'm using:

Step 2: Estimate your yardage. Once you have decided on what design you want to use for the skirt, you will need to figure out how many yards of fabric you will need. To do this you will need to know a couple things: the width of your fabric (usually either 45" or 54") and the direction of the pattern on the bolt of fabric. Most patterns run up the roll, but a few of them run "sideways" on the roll (this is called "railroading" the fabric).
If you are using a solid-color fabric, you may be able to use one single piece of fabric for the sides of the table skirt (depending on the weave of the fabric and the length of your skirt). To do this, you will essentially be running the fabric sideways around the piece, which will eliminate a lot of cutting. For most fabrics, however, you will be limited by the width of the bolt, so you will need to plan your pattern accordingly. Instead of one solid piece for the sides of the table skirt, you will need to cut several pieces and stitch them together. Because you don't want those seams to show, you may want to plan the width of the side pieces so that the seams are tucked away inside a pleat or on the back of the skirt so they won't be seen.

For instance, let's say that my table is only 12" deep but 60" wide and my fabric is only 45" wide. The pattern isn't railroaded, so there's no way I can use one solid piece of fabric to cover the width of the table skirt (I am 15" short as far as the overall dimensions of the fabric). Therefore, I can't use one solid piece to cover the front and back sides of the skirt, so I will probably want to add a pleat or two along the front and back and place the seams for my fabric pieces in those pleats.
Basically, as you plan out your design, you need to keep in mind the fabric width and the design you are going for and figure out a way to make those work together. If you are using a patterned piece of fabric (floral, stripes, checks, geometric print, etc.) in which you need to make the pattern match up, that may require extra fabric too since you will have to try to line up the pattern at each seam. Again, solid fabrics will probably be easier.
As you plan, be sure to keep in mind how much fabric pleats eat up. To illustrate this, here is a picture of 10 inches of fabric, spread out:


Once you have your sides sewed together, create your pleats. Fold the fabric into even pleats, pin, then pin well or baste (a temporary stitch) at the top of the pleat (no more than a half-inch from the top of the fabric). This will help hold the pleat in place as you assemble the rest of the skirt.
Next, pin the sides of the skirt to the top of the skirt. In this picture you can see the corner of the top of the skirt and the pleat on the side piece. Do your best to pin the pieces as carefully as you can, lining up the edges. Again, put the right sides together. If you are using piping, go ahead and insert it into the seam when you pin everything together. You may want to pause at this point, carefully turn the skirt right-side out, and place it on the piece of furniture that you are covering to double check that the fit is correct.

Begin to sew the table skirt top to the sides, again sewing .5-inch in from the edges and on the back side of the fabric. Sew over the pleats carefully, taking your time since the fabric layers will be thicker there.

As you get close to the corner, slow down and double check your fabric to make sure that all the fabric is lying flat as you sew over it. You may want to notch your corners slightly to help the corner lie smoothly.
When you get to the corner, make sure the needle is fully inserted in the fabric, then raise the presser foot enough to rotate the fabric so you can continue sewing down the next edge of the top.
Make your way around the entire top of the skirt, sewing it to the sides.

Here you can see what the seam will look like when you're finished. This is one of the corners of the skirt. It's kind of messy, though, so if you want to, you can finish off the seams with a zigzag stitch.

Switch out your presser foot for the zigzag one (I learned this the hard way by breaking a needle once!) and zigzag stitch the edges of the back side of the fabric together to prevent the material from unraveling in the future. At this point your skirt is finished except for the hem.

Since I decided to add a band of contrasting fabric to the bottom of my table skirt, I cut that out and pinned it to the solid color fabric (again, pin right sides together).

Here you can see how the fabrics will look once sewn together.

After sewing the two pieces together (switch back to a straight stitch first), iron the seam flat, then sew your hem. Start by pressing .5-1 inch of fabric at the bottom of the skirt.

Next, fold the bottom of the fabric again to the desired length of your hem. I decided to use a 3-inch hem. Sew the hem by top stitching at the top of the hem with your sewing machine or with a blind stitch done by hand. (Or, if you want to, you can use fabric glue so that you don't have to worry about visible stitches.)

Lastly, go back and iron your skirt to ensure that all seams lie flat and to press your pleats into place.

Here I am ironing the pleats into the corner so the overall skirt will hang nicely.


If you are using a solid-color fabric, you may be able to use one single piece of fabric for the sides of the table skirt (depending on the weave of the fabric and the length of your skirt). To do this, you will essentially be running the fabric sideways around the piece, which will eliminate a lot of cutting. For most fabrics, however, you will be limited by the width of the bolt, so you will need to plan your pattern accordingly. Instead of one solid piece for the sides of the table skirt, you will need to cut several pieces and stitch them together. Because you don't want those seams to show, you may want to plan the width of the side pieces so that the seams are tucked away inside a pleat or on the back of the skirt so they won't be seen.

For instance, let's say that my table is only 12" deep but 60" wide and my fabric is only 45" wide. The pattern isn't railroaded, so there's no way I can use one solid piece of fabric to cover the width of the table skirt (I am 15" short as far as the overall dimensions of the fabric). Therefore, I can't use one solid piece to cover the front and back sides of the skirt, so I will probably want to add a pleat or two along the front and back and place the seams for my fabric pieces in those pleats.
Basically, as you plan out your design, you need to keep in mind the fabric width and the design you are going for and figure out a way to make those work together. If you are using a patterned piece of fabric (floral, stripes, checks, geometric print, etc.) in which you need to make the pattern match up, that may require extra fabric too since you will have to try to line up the pattern at each seam. Again, solid fabrics will probably be easier.
As you plan, be sure to keep in mind how much fabric pleats eat up. To illustrate this, here is a picture of 10 inches of fabric, spread out:

Now here is the same 10 inches of fabric, folded into a pleat:

As you can see, that isn't a very deep pleat, only around 2 inches or so folded back on each side. So as you're trying to find a compromise between the width of your fabric and the look you're going for, be sure to take a minute to actually write down the amount of fabric it will take for pleats. Many times I will pull out the longest measuring tape I have, then run it around the edge of the furniture I want to cover, occasionally bending it back on itself to try to approximate the design I am going for and see how many of inches of fabric that really involves. It may also help to sketch it out (see photo above of my design for this project).
When estimating yardage, keep in mind that you will want to add .5 inch on each side of each piece for a seam allowance and extra fabric on the side pieces for the hem. (I like to do a nice, deep hem as I think it helps the skirt hang better and look nicer, so I usually plan for at least an extra 4-6 inches to turn under at the bottom.)
Step 3: Cut out your pieces. If you ever plan on washing your table skirt, prewash it before cutting (if it's machine washable, of course!), dry, and iron. You don't want to go to all the work of sewing your skirt and then have it shrink if you have to wash it at some point in the future.
You will need to cut 2 (or 3) main pieces: 1) the top of the skirt, 2) the sides of the skirt, and 3) material to make piping (optional -- see Step 1 above).
1) The dimensions for the top of the skirt will be the same as the top of the piece of furniture you're covering, plus .5 inch on each side for the seam allowance.
2) The dimensions for the table skirt sides will be the distance from the top of the furniture to the floor, plus .5 inch on all sides for seam allowances, plus the hem allowance on the bottom. Plan on turning under the fabric twice for the hem: first a small .5-1 inch fold, then another 2-4 inches or whatever looks best to you.* Again, the number of pieces you will need to cut to make the sides of the table skirt will vary depending on the design and the fabric you choose.
3) If you are making piping, measure the distance around the top of the table and make a little over that amount.
Measure a few times, double check your design, and then cut away!

For my table skirt, I added a floral band of fabric at the bottom of the skirt, so in this picture I am cutting out the strip. Only about 6 inches will be showing, but I am cutting a 10-inch strip of fabric (6 inch + 1 inch seam allowances + 3 inches for hem). This is an all over floral pattern with no clear up or down, so I am treating it like a railroaded fabric and cutting one long piece instead of having to sew together multiple pieces.
* Sometimes I intentionally leave the table skirt long and wait until I get it sewn together before I do the hem. This allows me to actually put it on the piece of furniture I'm covering and make minor adjustments before sewing the hem.
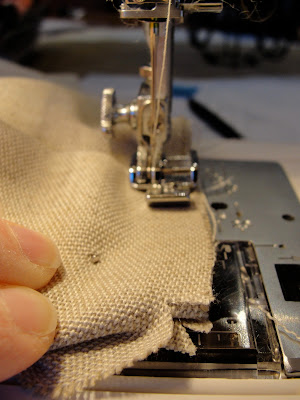
Step 4: Sew your table skirt. Now that you have all your pieces cut out, you will need to begin assembling the skirt. First, go ahead and sew together the pieces you cut to make the sides of the skirt. Place the right sides together and pin, then sew them together (on the back side of the fabric) a half-inch in from the edges. You will now have one long, continuous piece of fabric that will make up the sides of the table skirt. (It should look like one big tube of fabric.)
Once you have your sides sewed together, create your pleats. Fold the fabric into even pleats, pin, then pin well or baste (a temporary stitch) at the top of the pleat (no more than a half-inch from the top of the fabric). This will help hold the pleat in place as you assemble the rest of the skirt.
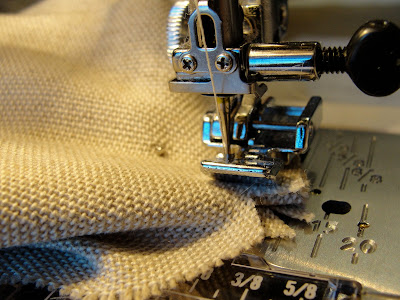
Next, pin the sides of the skirt to the top of the skirt. In this picture you can see the corner of the top of the skirt and the pleat on the side piece. Do your best to pin the pieces as carefully as you can, lining up the edges. Again, put the right sides together. If you are using piping, go ahead and insert it into the seam when you pin everything together. You may want to pause at this point, carefully turn the skirt right-side out, and place it on the piece of furniture that you are covering to double check that the fit is correct.
Begin to sew the table skirt top to the sides, again sewing .5-inch in from the edges and on the back side of the fabric. Sew over the pleats carefully, taking your time since the fabric layers will be thicker there.

As you get close to the corner, slow down and double check your fabric to make sure that all the fabric is lying flat as you sew over it. You may want to notch your corners slightly to help the corner lie smoothly.

When you get to the corner, make sure the needle is fully inserted in the fabric, then raise the presser foot enough to rotate the fabric so you can continue sewing down the next edge of the top.

Make your way around the entire top of the skirt, sewing it to the sides.

Here you can see what the seam will look like when you're finished. This is one of the corners of the skirt. It's kind of messy, though, so if you want to, you can finish off the seams with a zigzag stitch.

Switch out your presser foot for the zigzag one (I learned this the hard way by breaking a needle once!) and zigzag stitch the edges of the back side of the fabric together to prevent the material from unraveling in the future. At this point your skirt is finished except for the hem.

Since I decided to add a band of contrasting fabric to the bottom of my table skirt, I cut that out and pinned it to the solid color fabric (again, pin right sides together).

Here you can see how the fabrics will look once sewn together.

After sewing the two pieces together (switch back to a straight stitch first), iron the seam flat, then sew your hem. Start by pressing .5-1 inch of fabric at the bottom of the skirt.

Next, fold the bottom of the fabric again to the desired length of your hem. I decided to use a 3-inch hem. Sew the hem by top stitching at the top of the hem with your sewing machine or with a blind stitch done by hand. (Or, if you want to, you can use fabric glue so that you don't have to worry about visible stitches.)

Lastly, go back and iron your skirt to ensure that all seams lie flat and to press your pleats into place.

Here I am ironing the pleats into the corner so the overall skirt will hang nicely.
And a few pictures of the finished product:


A close-up shot of the corner; there are pleats on each corner of the skirt.

So there you go! Feel free to ask questions in the comments section below or by sending me an email at onehalfworld (at) gmail.com
4 comments:
I was searching online for a tutorial on how to sew this welting I've made onto the lower edge of the tableskirt in the LR. Your post came up on my Google search. I thought, "I know that blog name!"
Jamie/M
Hi- found your blog through searching for a tutorial. I want to creat a table skirt using a solid linen for the ikea billy bookcase. Measurements are 31 width, 11 depth, and 42 height. How much fabric should I buy? 4 or 5 yards? Thanks!
vv
Nice blog you hhave
Post a Comment