Showing posts with label KIDS. Show all posts

January 26, 2012

An Illustrated Life

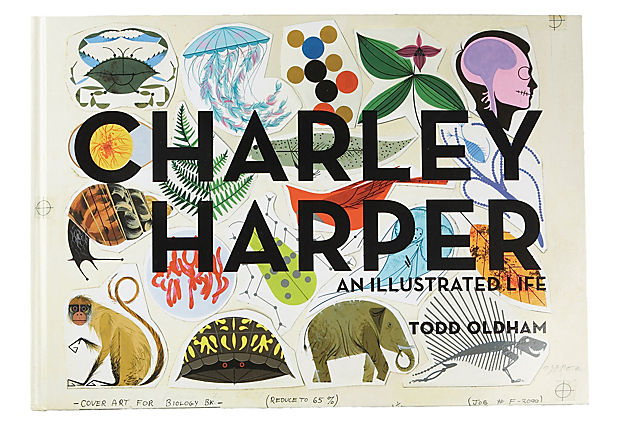
Just a quick note to say that One King's Lane has a terrific price on Charley Harper: An Illustrated Life.


This is the big edition (424 pages, 13x19 inches, 12 pounds).  It retails for $200 but is $99 plus an extra 20% off with the code "INDULGE" (good through 1/27/12).  I know that's a lot to spend for a book, but I think it's a terrific coffee table book for kids and adults.  Harper's illustrations are just so colorful and fun--very creative and something you can look at again and again.

If you want the mini version, it's available for $20 at Amazon, or support your local book store by buying it locally (I know Beaverdale Books carries some Oldham/Harper books).  Also, you can read more about Harper and buy his prints here.

November 14, 2011

Books for sick days

Or, books about sick days, for any day.

Here are two new additions to our library of children's books.  Both are great--the text and the illustrations are really well done.

A Sick Day for Amos McGee
Written by Philip Stead, Illustrated by Erin Stead


This book follows Amos McGee, who visits his friends at the zoo every day until one day he wakes up with a cold.  His animal friends, worried about him, decide to visit him for a change, and they care for him until he feels better.  It is a very simple story but well told and beautifully illustrated in great detail.  The pencil drawings and limited color on each page are just so charming.  If your kids like animals or if you read books primarily for the illustrations, this book is for you!  


Llama Llama Home with Mama
Written and illustrated by Anna Dewdney

We have (and love) all of the Llama Llama books, recounting the everyday adventures of little Llama Llama as he goes shopping, begins school, or tries to fall asleep.


In the latest book, Llama Llama is home sick.  Dewdney touches on typical kid behavior like not wanting to take medicine, feeling yucky, and getting bored and wanting to go outside and play.


Although the book starts with only little Llama being sick, before long his mother gets a runny nose too, and he ends up learning that he can help his mama just like she helped him.  Like all the books in this series, the illustrations are perfect at capturing emotions on the two characters' faces, and it has a moment of high drama in which little Llama loses control.  This one involves flying tissues (which my son finds hilarious).  I love the easy rhymes and the subtle messages of kindness and patience in this book.

What about you?  Any books you recommend for a sick day?

November 2, 2011

James says...

Happy Wednesday!  A couple insights into our little guy's mind, to help get you through the middle of the week...

Future paleontologist

"Mommy, do you know why I have to be good all the time?" he asked me.  "No, James.  Why?" "So I can grow up to be a paleontologist like Barnum Brown."


Yes, this guy is my son's hero.  Discoverer of the first T-Rex skeleton, dapper dresser, dude named after the circus (yes, really).

Also, as we were leaving the library with a new stack of dinosaur books (what else?), we passed a portly gentleman standing outside.  "Mommy," J told me (loudly!), "that boy has a baby growing in his tummy!  That's why it's so big!!"

Maybe in addition to reading about maiasaura we should be reading about manners!  :)

October 25, 2011

How to make a Dalek costume

Halloween is just around the corner, so I thought I would share our son's costume from last year.  He really wanted to be a Dalek from the Doctor Who series.  I couldn't find any ready-made costumes, so we decided to make one ourselves.  I thought maybe someone else would be in the same boat this year, so here are the instructions if you want to put together a Dalek costume for your child (or yourself!).

Materials
Cardboard box (big enough vertically to cover your head and hang down to somewhere between your knees and ankles)
A plastic bowl in the chosen Dalek color (you will be ruining this bowl, so buy something cheap!)
Spray paint to match your Dalek color
Black tape (electrical tape or the wider black duck tape works well)
A couple packages of styrofoam balls
Wooden dowels
Glue (we used a hot glue gun), drill and drill bits


Our inspiration


Our version

Instructions
1. Open both ends of the box and fold the sides to create an octagon shape by bending the cardboard in the middle of each side.  Make the creases as deep as possible so that your box will look more Dalek-shaped and not like a square. When you're finished, leave one end of the box open and creatively fold the other end in, layering the pieces of cardboard (cutting if necessary) and taping them together so that the box is now closed on one end (this is where your head will go, so make sure you tape it securely).

2. Cut holes for your arms and a slit for your eyes.

3. Spray paint the cardboard box.  My advice is to use a high gloss spray paint, which will look much better than a flat finish (though it's a bit pricier).

4. As the paint dries, measure your box to figure out how many "bumps" you will need on the sides (this will depend on how far apart you want to space them and how big your cardboard box and styrofoam balls are).  Cut each styrofoam ball in half and spray paint them black (or silver or gold, again depending on your color choice for the costume).  Beware: the spray paint will probably "eat" the surface of the styrofoam a little, but they'll still look okay.

5. At this point your box should have dry paint, so use the black tape to outline the shape.  You can put tape on all the creases or just at the top and bottom of the costume.  Then use a hot glue gun to stick all the styrofoam semicircles on the sides of the costume.

6. Make the helmet: drill a couple small holes in the bowl for the Dalek "ears" -- you want the dowels to fit snugly into the holes.  Also add a hole in the front of the bowl for the "eye."  When you're finished, place the bowl (upside down, of course) onto the top of your cardboard box (where you previously taped everything--so you will conveniently cover up all that tape!).  Use some more black tape to cover the rim of the bowl and make it look more realistic.

7. Make the "ears" and the "eye": be creative here.  For the "ears," we used an empty toilet paper roll and cut it in half, then covered it with aluminum foil and inserted a dowel in the end of the tube and pushed the dowel down into the bowl.  We also saved one half of a styrofoam ball and put another dowel in the end, then used a combination of black and silver tape to make the "eye," but you might be able to come up with something better!

8. Don't forget your whisk and plunger!


If you try this, I'd love to see your result!  Our son was so excited about his red Dalek costume.  Everybody thought he was just a robot, but that didn't bother him.  He just "exterminated" them for their ignorance.

Enjoy, and Happy Halloween!

October 18, 2011

Boy's bed: before and after


I have been doing some rearranging in J's bedroom (see the initial setup here).  Now that he's older, we raised his bed higher by putting his boxsprings back on his bed frame.

Here's what it looked like before:

And here it is after:

I covered the boxsprings with a mattress pad and a fitted black sheet.  The blue quilt is from Target, and the colorful duvet cover and sham are from IKEA.

The quilt is not very thick, but I think it would work well as a single layer during the summer or underneath a duvet for the winter.  I like the washability of the IKEA duvet cover, but the colors are really bright, so I think it looks better folded up at the end of the bed.

I hope to get his room finished soon, so I'll post more pictures then!

October 14, 2011

Little blue elephant


I was at a flea market yesterday and spotted this cute vintage blue elephant.  It would be a fun little accessory for a child's room, and I immediately thought of this room by San Francisco design firm Lotus Bleu:


Can you see why the ceramic elephant figure reminded me of this room?  I love the framed elephant print and the blue wall color, not to mention the printed window shades, the tole chandelier, and the pink and blue fabrics.  Plus, it appears to be not only pretty, but practical too: open floor space for playing, trundle under the daybed, kid-sized furniture, a useful hamper for clothes or toys.


And check out the cute matching bathroom:


You should definitely scroll through Lotus Bleu Interior's portfolio; they have a lot of great projects that I recognized, but I hadn't realized they were responsible for these interiors!

See their photo gallery HERE.

Have a great weekend!

August 9, 2011

Dinosaur party

Remember J's instructions about how to make a dinosaur cake?  Well, we finally had his party and the day before we worked together to make the cake exactly what he wanted.  I ended up using a large round pan and doing coconut frosting that we made green to look like grass.  We put a few little sugar leaves around the cake to add to the "vegetation" and positioned some dinosaur candles on the top and the sides.  The candles were the best thing; they saved me from having to mold a triceratops, stegosaurus, tyrannosaurus rex, and elasmosaurus.  Actually, there was no elasmosaurus, but J compromised on that (thank goodness!).


We kept it easy and ordered pizza and lots of cheesesticks (which are J's favorite; he calls them "bread pizza") and made a big salad bar.  For dessert, we also made cake balls but made them in the shape of ovals and coated them with white chocolate to look like dinosaur "eggs."

A few weeks ago, we put together the invitations for the party.  I bought a pack of these printable cards and envelopes at Target:


Then he chose a dozen different dinosaurs and I put their names on the front of the cards using our home printer.  Inside, I typed the party specifics.  When I was finished, J drew pictures of each kind of dinosaur:


Ankylosaurus was one of my favorites: the scribbles are his armor, and check out the club he has on the end of his tail "for whacking meat eaters," James says.

J drew dinosaur "tracks" out of chalk on the sidewalk so it looked like a dinosaur was attending the party.  He also lined up all his toy dinosaurs on the dining center to make a little centerpiece.  We used bright colors for the cups, napkins, balloons, etc., and we found the best pinata at Party City, which came to the rescue with a great selection of dinosaur products:


This guy was gigantic and heavy-duty; we had to cut open the cardboard a little to help the kids out.  Otherwise, the wiffle ball bat had no chance!

For favors, we used these cute puzzle dinosaur crayons and some wind-up dinosaur toys from Michael's, plus of course all the pinata candy:


The best thing?  This guy was very happy with his party (and this T. Rex t-shirt)!


July 27, 2011

IKEA RIBBA shelves

 
Just a little recent update to J's bedroom: we put up two RIBBA picture ledges for some book storage.


I am finding these are great for paperbacks as it helps remind your children of the books they have (since paperbacks have such a thin spine, it's easy to overlook them on the bookcase).  Plus, I like seeing all the pretty book covers.

I just swap out the books every couple weeks or so, which usually results in our rediscovering a book we haven't read for a while.


These shelves come in two lengths: 45 inches and 21.5 inches.  One thing I learned: the holes on the longer RIBBA shelves are spaced 16-inches apart, perfect for making sure that your shelves are screwed into the wall studs.  However, the holes for the shorter RIBBA shelves are closer together (only 13-inches apart), which I think makes them harder to hang since you're only guaranteed to hit one stud.  I was actually planning on placing the shelves end-to-end (one large and one short per row) to make two 5.5-foot ledges, but the spacing of the screw holes messed up my plan.  If you are interested in buying these, I would advise measuring your wall and locating the studs before you go to IKEA; then just double check the spacing of the holes on the picture ledges before you buy!

I'm sure we'll find another use for the small shelves.  At least at $15 for the 45-inch ledge and $10 for the 22-inch ledge, they're not going to break the bank.


July 25, 2011

Guest post: how to make a dinosaur cake

Today's post comes from my preschool son, who is currently busy planning his upcoming birthday party.  In his mind, this will be a major extravaganza, the most important element of which is an elaborate dinosaur cake.  I can bake a cake, but I am not a cake decorator.  I thought I had come up with a compromise when he agreed to a cake with dinosaurs posed on top.  I was envisioning little plastic dinosaurs perched atop chocolate cupcakes when he wandered back into the kitchen to double check something: "Mommy, not toy dinosaurs, though.  Dinosaurs made of frosting."  Agh!  I was so close!  Unfortunately I do not know how to make a dinosaur out of frosting, so while I was spending some quality time with Google and the "how to make a dinosaur cake" search findings, he decided to spare me and draw out his concept cake.

Here's what he wants:

As I studied this drawing trying to imagine how to create this impossible cake, he again took mercy on me and decided to write out the recipe.  Here it is, in case you want to make a similar cake of your own:


Can't read the directions?  I've annotated the recipe below:


See?  How hard can it be?

April 27, 2011

Lego store

A few weeks ago we took a quick weekend trip to Minneapolis and the Mall of America.  I had heard great things about the LEGO store there, but I was still shocked at the size of the sculptures they had.  They were amazing!!  Here's a little photo tour.  If you can visit, I highly recommend it!


A view of all the sculptures above the store


Loved the minotaur!


The globe was my favorite -- I can't imagine the time (and math!) that went into making this


This robot was SO huge!


Everyone loved the wall of bricks


April 4, 2011

Recycling kids' art


I don't know how it is at your house, but recently our preschooler has been prolific at producing artwork.  Coloring pages, watercolor paintings, miscellaneous "sculptures"--you name it, he's been hard at work making multiple copies.

One way I try to display some art without keeping all of it is by framing a few pieces and hanging them in his room.  For a few months I've had some of his colorings there (see his room tour here).  But then I had an idea to try to incorporate some of his more "abstract" work (I mean the kind with squiggles or paint everywhere!) by framing it with a silhouette of sorts.  I decided to use a Doctor Who theme since he's a big fan of the show.  Here's how you can make your own silhouette art:

Supplies you will need: a few kids' paintings to serve as the background, some construction paper or cardstock, scissors, and images of what you'd like to silhouette.

I just found a couple pictures online of a Dalek and the TARDIS, then blew them up in Microsoft Word and printed them out in grayscale since all I really needed was the silhouette.  Feel free to use whatever your child likes: animals, a silhouette of their profile, trucks and cars, shapes, numbers and letters, etc.


Once you have printed out the image you want to use, carefully cut around the edges and center it on the colored paper.


Trace around the image, then cut it out of the middle of the construction paper.  This is probably the most time-consuming stage since you want to be really neat with your cuts.


When you're finished cutting out the image, tape your kids' artwork to the back of the paper, then mount the art inside your picture frame.  Here is the completed Dalek silhouette.


And here is the finished TARDIS silhouette.


I hung an inexpensive KVART sconce from IKEA above the frames to light them from above.


The final product:

Related Posts Plugin for WordPress, Blogger...